# 开发环境搭建
# 开发工具
- 微信开发者工具
- IDEA or Eclipse
# 服务器版本、JDK版本等
- JDK 1.8
- Oracle 11g
- Redis >= 3.0
- Maven >= 3.0
- Node >= 12
# 使用的第三方开源版本包
# 主框架
- Spring Boot 2.2.x
- Spring Framework 5.2.x
- Spring Security 5.2.x
# 持久层
- Apache MyBatis 3.5.x
- Hibernate Validation 6.0.x
- Alibaba Druid 1.2.x
# 视图层
- Vue 2.6.x
- Axios 0.21.x
- Element 2.15.x
# 微信公众号开发者设置
微信生态下开放的接口能力越来越多,借此文章说明下微信生态下常见场景开发需要准备的前置条件
# 公众号关联小程序
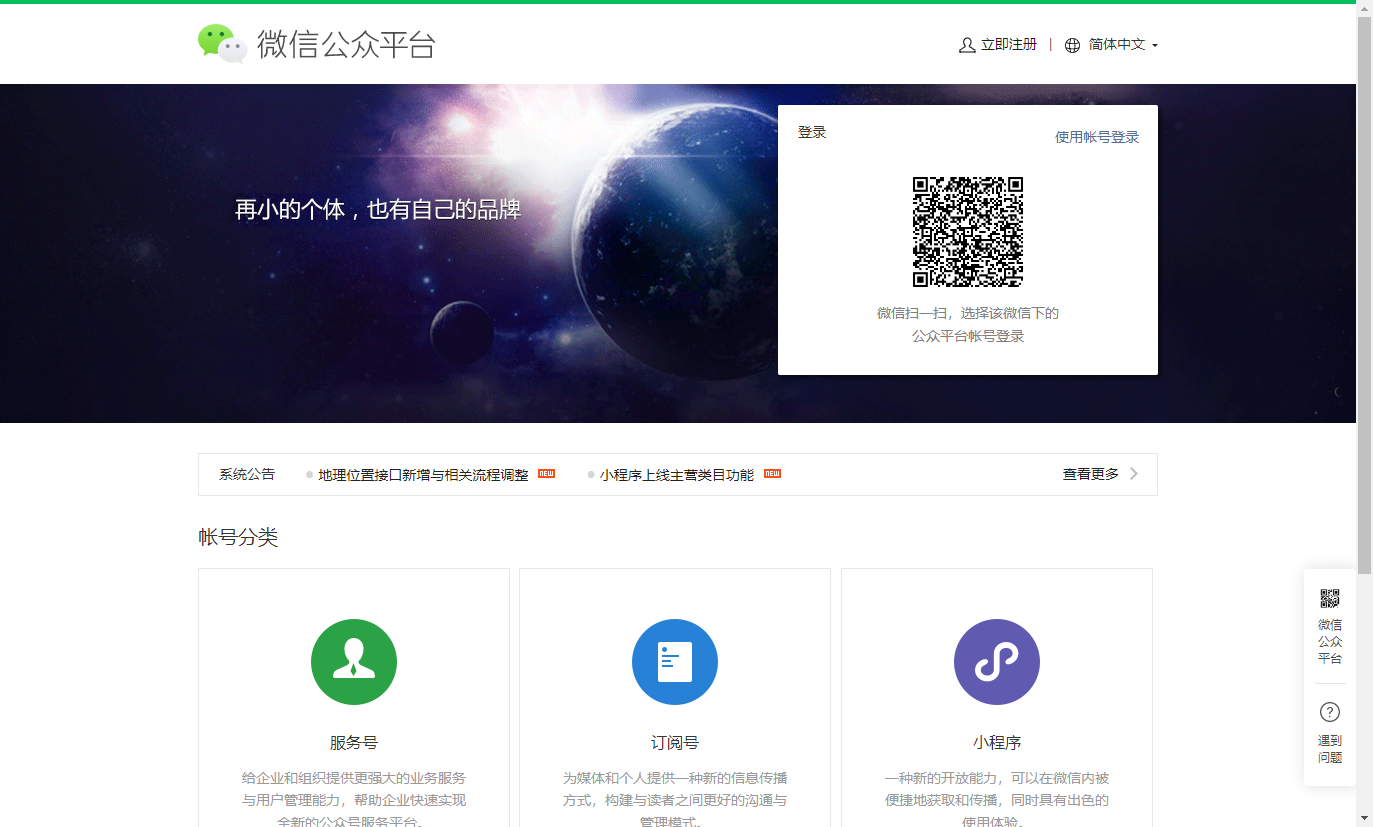
- 使用管理员登录微信公众平台(没有公众号按注册流程注册): 微信公众平台 (opens new window)
- 进入公众号的小程序管理菜单,点击添加
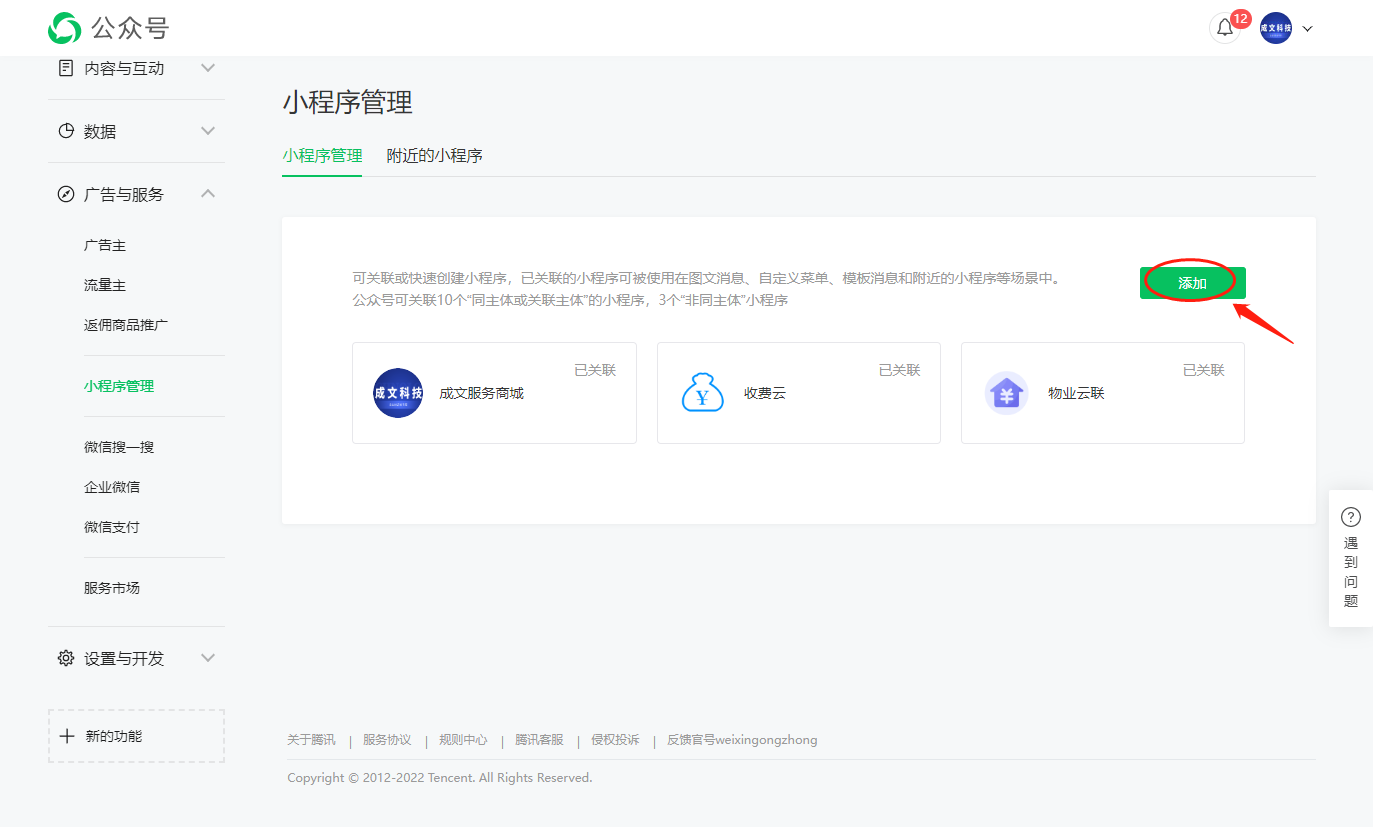
- 选择快速注册并认证小程序,如果已注册小程序,则选择关联小程序

- 管理员授权后填写相关内容即可关联小程序
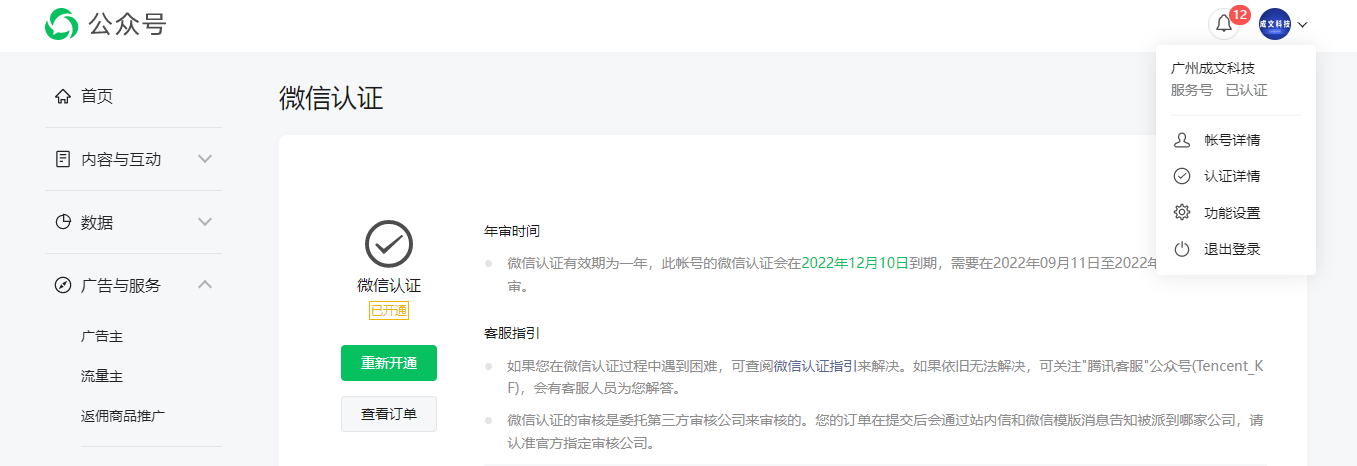
- 如果公众号没有认证需要进行认证,认证后方可开通接口权限
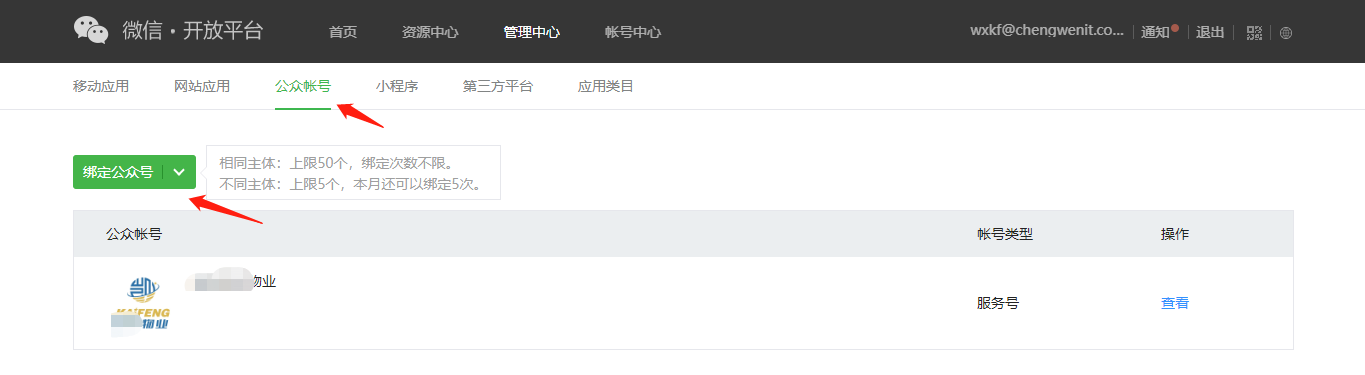
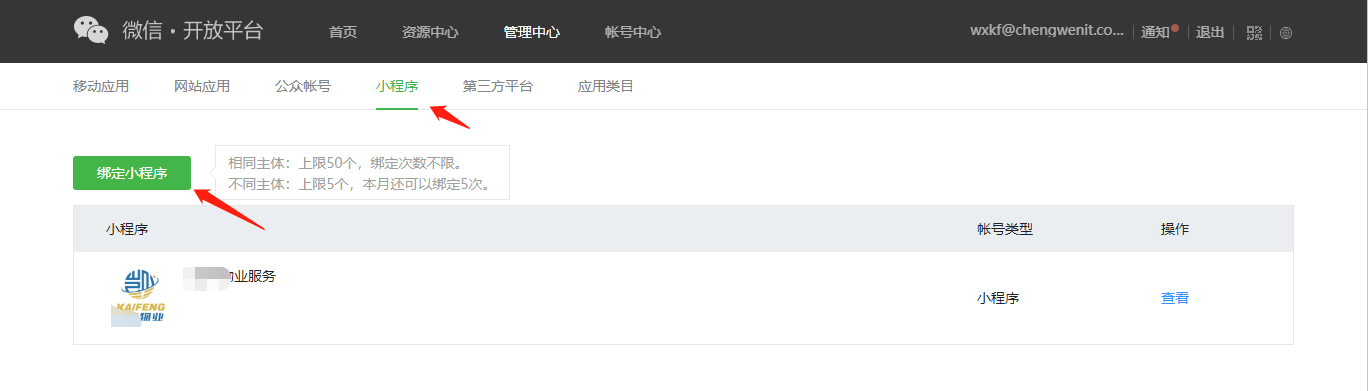
# 绑定微信开放平台
小程序和公众号进行关联后,只是可以在模板消息,菜单中跳转到小程序,但仍然无法打通小程序和公众号的用户。
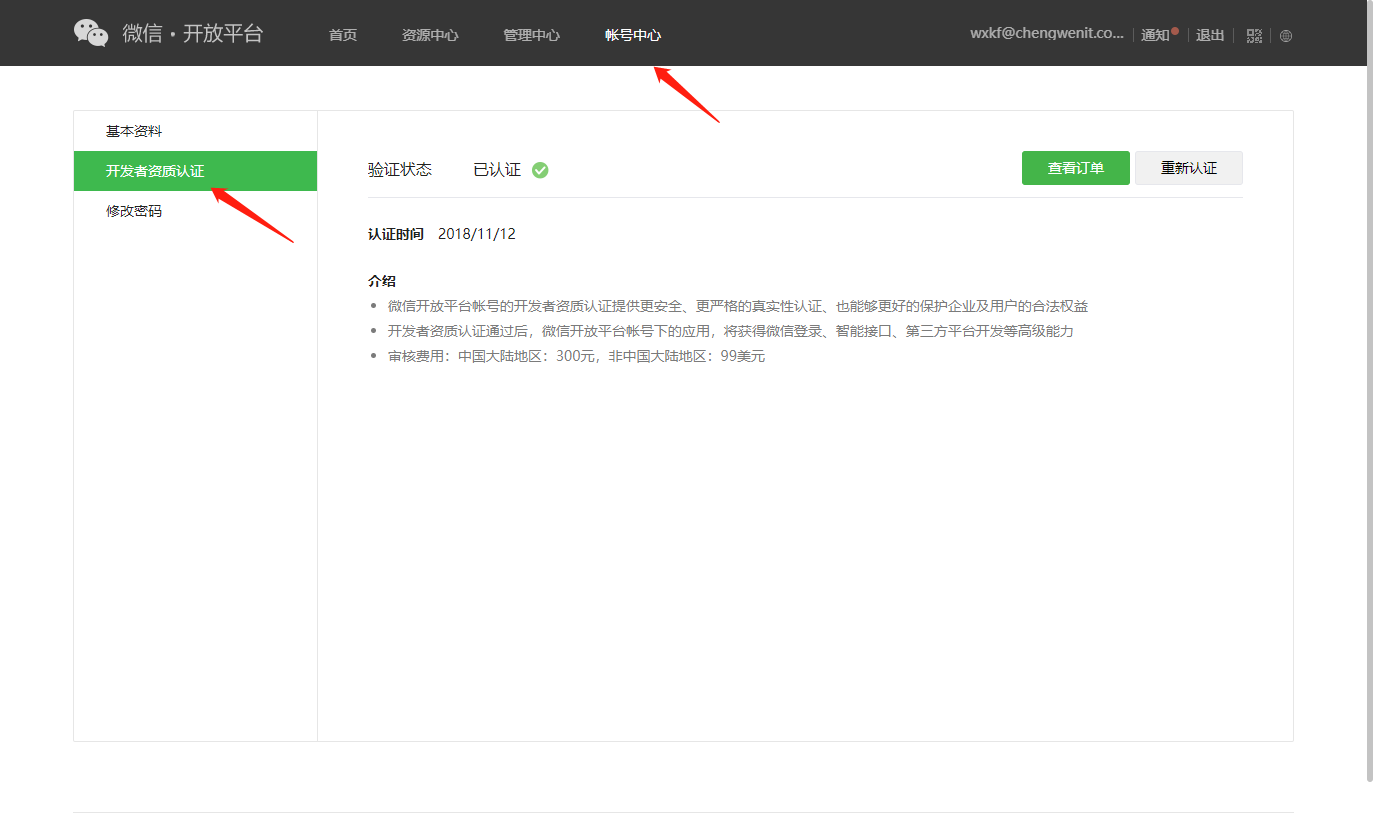
- 注册微信开放平台,并登陆,注册链接: 微信开放平台 (opens new window)
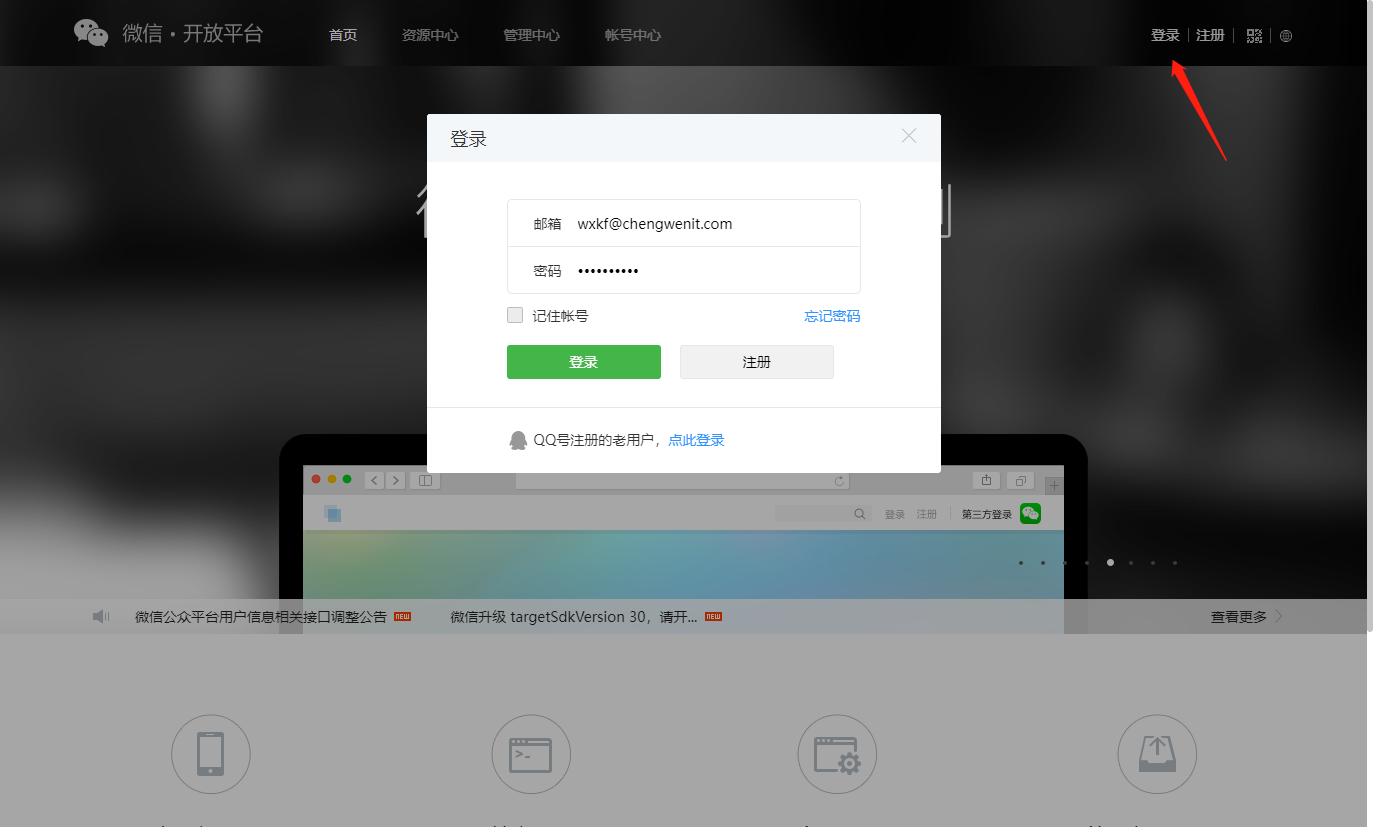
- 通过开发者认证
- 分别绑定公众号和小程序
# 微信开发官方文档链接:
- 微信公众号开发 (opens new window)
- 微信小程序开发 (opens new window)
- 微信开放平台开发 (opens new window)
- 企业微信开发 (opens new window)
- 微信支付开发 (opens new window)
# 数据库表结构字典
导入数据库dmp文件,在数据库对象备注中查询
# 环境配置过程文档
# 后端运行
- 将代码hysrm.zip包解压到工作目录
- 导入到Eclipse,菜单 File -> Import,然后选择 Maven -> Existing Maven Projects,点击 Next> 按钮,选择工作目录,然后点击 Finish 按钮,即可成功导入。
Eclipse会自动加载Maven依赖包,初次加载会比较慢(根据自身网络情况而定)
- 创建Oracle数据库用户hyyl并导入数据脚本HYSRM.sql
- 打开目录运行com.ruoyi.RuoYiApplication.java启动项目。
后端运行成功可以通过(http://localhost:8080 (opens new window))访问,但是不会出现静态页面,可以继续参考下面步骤部署hysrm-front前端,然后通过前端地址来访问。
# 前端运行
# 进入项目目录
cd hysrm-front

# 安装依赖
npm install

# 强烈建议不要用直接使用 cnpm 安装,会有各种诡异的 bug,可以通过重新指定 registry 来解决 npm 安装速度慢的问题。
npm install --registry=https://registry.npmmirror.com

# 本地开发 启动项目
npm run dev
# 必要配置
- 修改数据库连接,编辑resources目录下的application-druid.yml
    datasource:
        type: com.alibaba.druid.pool.DruidDataSource
        driverClassName: oracle.jdbc.driver.OracleDriver
        druid:
            # 主库数据源
            master:
                url: jdbc:oracle:thin:@x.x.x.x:1521/orcl
                username: hysrm
                password: password
            # 外部ERP NC
            erp:
                # 从数据源开关/默认关闭
                enabled: true
                url: jdbc:oracle:thin:@x.x.x.x:59103/ncdb
                username: xxx
                password: xxx
            # 外部OA ecology
            oa:
                # 从数据源开关/默认关闭
                enabled: false
                url: jdbc:oracle:thin:@x.x.x.x:59104/ecology
                username: xxx
                password: xxx
- 修改redis配置,编辑resources目录下的application.yml
redis:
    # 地址
    host: xxx.xx.xxx.xx
    # 端口,默认为6379
    port: 6379
    # 数据库索引
    database: 9
    # 密码
    password:
- 修改服务器配置,编辑resources目录下的application.yml
# 开发环境配置
server:
  # 服务器的HTTP端口,默认为80
  port: 端口
  servlet:
    # 应用的访问路径
    context-path: /应用路径
# 部署系统
因为本项目是前后端完全分离的,所以需要前后端都单独启动好,配置nginx反向代理,才能进行访问。
# 后端部署
在ruoyi项目的bin目录下执行package.bat打包Web工程,生成war/jar包文件,然后会在项目下生成target jar文件.
打包的jar文件放在服务器 /home/hysrm/ruoyi.jar后,进入对应目录启运行以下命令重启服务
./start.sh restart
# 前端部署
当项目开发完毕,只需要运行一行命令就可以打包你的应用
# 打包正式环境
npm run build:prod
#### 打包预发布环境
npm run build:stage
构建打包成功之后,会在根目录生成 dist 文件夹,里面就是构建打包好的文件,通常是 ***.js 、***.css、index.html 等静态文件。整个dist目录下的文件拷贝到/home/hysrm/ruoyi-ui即可
# nginx反向代理配置
- nginx配置文件路径 /usr/local/nginx/conf/nginx.conf , 配置调整后需要运行以下命令重载配置文件
/usr/local/nginx/sbin/nginx -s reload
- 配置文件
worker_processes  1;

events {
    worker_connections  1024;
}

http {
    include       mime.types;
    default_type  application/octet-stream;
    sendfile        on;
    keepalive_timeout  65;
    server {
        listen       443 ssl;
        server_name  iec.hy-la.com;
        ssl_certificate ../cert/8145025_iec.hy-la.com.pem;
        ssl_certificate_key ../cert/8145025_iec.hy-la.com.key;
        charset utf-8;

        #access_log  logs/host.access.log  main;


	#h5短信页面
 	location /coupon {
            root   /home/hysrm/coupon;
            index  coupon.html coupon.htm;
   	  try_files $uri $uri/ /coupon.html;
          }

        location / {
            root   /home/hysrm/ruoyi-ui;
	  try_files $uri $uri/ /index.html;
            index  index.html index.htm;
        }

		location /prod-api/ {
			proxy_set_header Host $http_host;
			proxy_set_header X-Real-IP $remote_addr;
			proxy_set_header REMOTE-HOST $remote_addr;
			proxy_set_header X-Forwarded-For $proxy_add_x_forwarded_for;
			proxy_pass http://localhost:8080/;
		}
        #error_page  404              /404.html;

        # redirect server error pages to the static page /50x.html
        #
        error_page   500 502 503 504  /50x.html;
        location = /50x.html {
            root   html;
        }
}

server {
    listen 80;
    server_name iec.hy-la.com;
    rewrite ^(.*)$ https://${server_name}$1 permanent;
}
}
# 服务重启
- sas